> ## Documentation Index
> Fetch the complete documentation index at: https://docs.junction.com/llms.txt
> Use this file to discover all available pages before exploring further.
# Quickstart
> Get started with the Junction API by setting up API keys, connecting a wearable device, and fetching your first health data in minutes.
## 1. API keys
Let's test out running Junction locally by cloning the [Quickstart app](https://github.com/tryVital/quickstart).
To create a team and get your API keys, you first need to sign up for a Junction account in the [Dashboard](https://app.junction.com).
Once registered, you can create a team by hovering over your username at the bottom of the Dashboard sidebar.
A team is associated with a region (either `EU` or `US`). The region dictates where data is stored.
You can learn more at [regions](/api-details/regions).
To create your API keys, go to the configuration section of the Dashboard.
For each region, you'll have access to two environments: Sandbox and Production.
We'll start in the Sandbox environment, so create a new Sandbox API key.
If you get stuck at any point in the Quickstart, help is just a click away!
Join our Slack channel or send us a message to
[support@junction.com](mailto:support@junction.com)
| Environment | | |
| ------------ | ------------------------------------------- | --------------------------- |
| `sandbox` | Testing, connect up to 50 live users | api.sandbox.us.junction.com |
| `production` | Live environment to use with real customers | api.us.junction.com |
## 2. Running Quickstart locally
Once you have your API keys, it's time to run the Junction Quickstart locally!
The instructions below will guide you through the process of cloning the [Quickstart repository](https://github.com/tryVital/quickstart),
customizing the `.env` file with your own Junction `API_KEY` and finally, building and running the app.
```bash 1. Clone quickstart and run locally theme={null}
# Note: If on Windows, run
# git clone -c core.symlinks=true https://github.com/tryVital/quickstart
# instead to ensure correct symlink behavior
git clone https://github.com/tryVital/quickstart.git
# Create .env, then fill
# out VITAL_API_KEY, VITAL_REGION (eu, us) and VITAL_ENV in .env
touch .env
# Note: must use python 3
# For virtualenv users:
# virtualenv venv
# source venv/bin/activate
poetry install
# Start the backend app
cd backend/python
source ./start.sh
```
Open a new shell and start the frontend app. Your app will be running at `http://localhost:3000`.
```bash 2. Run quickstart frontend theme={null}
# Install dependencies
cd quickstart/frontend
npm install
# Open .env.local, then fill
# out NEXT_PUBLIC_VITAL_API_KEY, NEXT_PUBLIC_VITAL_ENV and NEXT_PUBLIC_VITAL_REGION
# Start the frontend app
npm run dev
# Go to http://localhost:3000
```
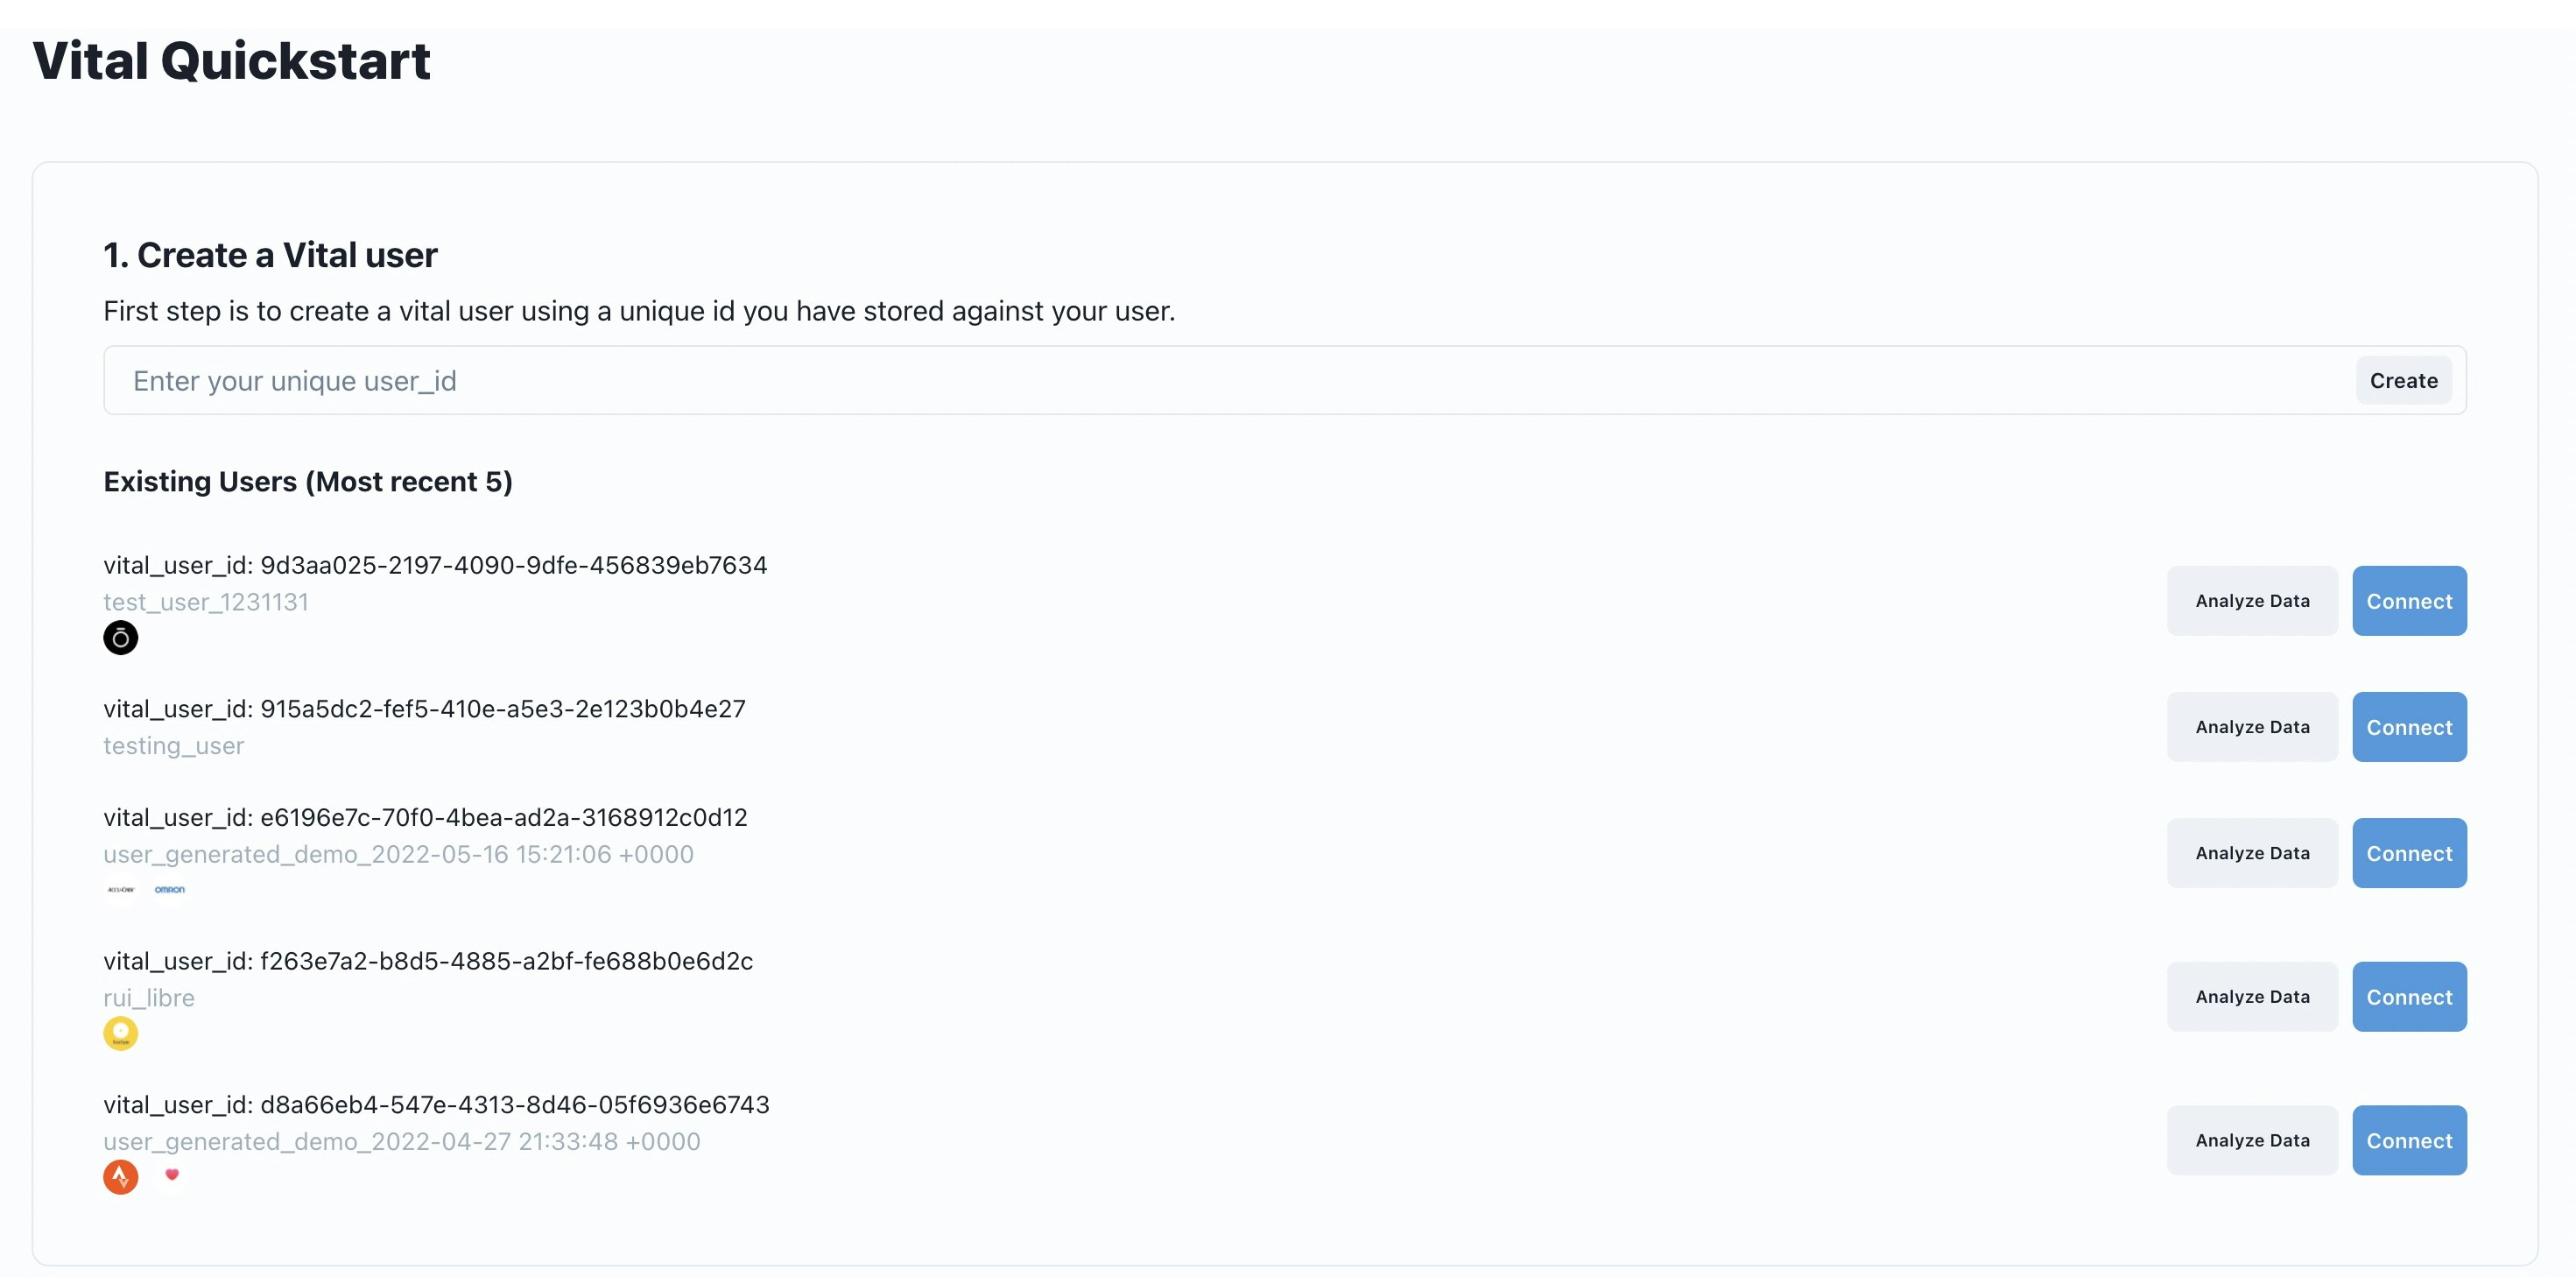
## 3. Creating your first User
When retrieving data or connecting devices, Junction will require a `user_id` as input.
A `user_id` is a unique representation that we hold for a user. It allows you to fetch data for that user.
To create a user, you need to pass a unique id (`client_user_id`). This represents the user in your system. Our recommendation is
to store the Junction `user_id` in your db against the user row.
Personally identifiable information (PII), such as an email address or phone number, should not be used as input for the `client_user_id` parameter.
Enter a new `client_user_id` and tap Create:
This can also be achieved via the API as follows.
```bash Creating a Junction user (bash) theme={null}
curl --request POST \
--url {{BASE_URL}}/v2/user/ \
--header 'Accept: application/json' \
--header 'Content-Type: application/json' \
--header 'x-vital-api-key: ' \
--data '{"client_user_id":""}'
```
```typescript TypeScript theme={null}
import { JunctionClient, JunctionEnvironment } from "@junction-api/sdk";
const client = new JunctionClient({
apiKey: "YOUR_API_KEY",
environment: JunctionEnvironment.Sandbox,
});
const data = await client.user.create({ clientUserId: "" });
```
```python Python theme={null}
from junction import Junction
from junction.environment import JunctionEnvironment
client = Junction(
api_key="YOUR_API_KEY",
environment=JunctionEnvironment.SANDBOX,
)
data = client.user.create(client_user_id="")
```
```java Java theme={null}
import com.junction.api.Junction;
import com.junction.api.core.Environment;
import com.junction.api.resources.user.requests.UserCreateBody;
Junction client = Junction.builder()
.apiKey("YOUR_API_KEY")
.environment(Environment.SANDBOX)
.build();
var data = client.user().create(
UserCreateBody.builder()
.clientUserId("")
.build()
);
```
```go Go theme={null}
import (
"context"
junction "github.com/junction-api/junction-go"
"github.com/junction-api/junction-go/client"
"github.com/junction-api/junction-go/option"
)
c := client.NewClient(
option.WithApiKey("YOUR_API_KEY"),
option.WithBaseURL(junction.Environments.Sandbox),
)
response, err := c.User.Create(context.TODO(), &junction.UserCreateBody{
ClientUserId: "",
})
if err != nil {
return err
}
fmt.Printf("Received data %s\n", response)
```
```swift Swift theme={null}
let user = try await VitalClient.shared.user.create(clientUserId)
```
## 4. Connecting a source
A source, at Junction, is a medical device, wearable, or lab. It is a source of information for health data.
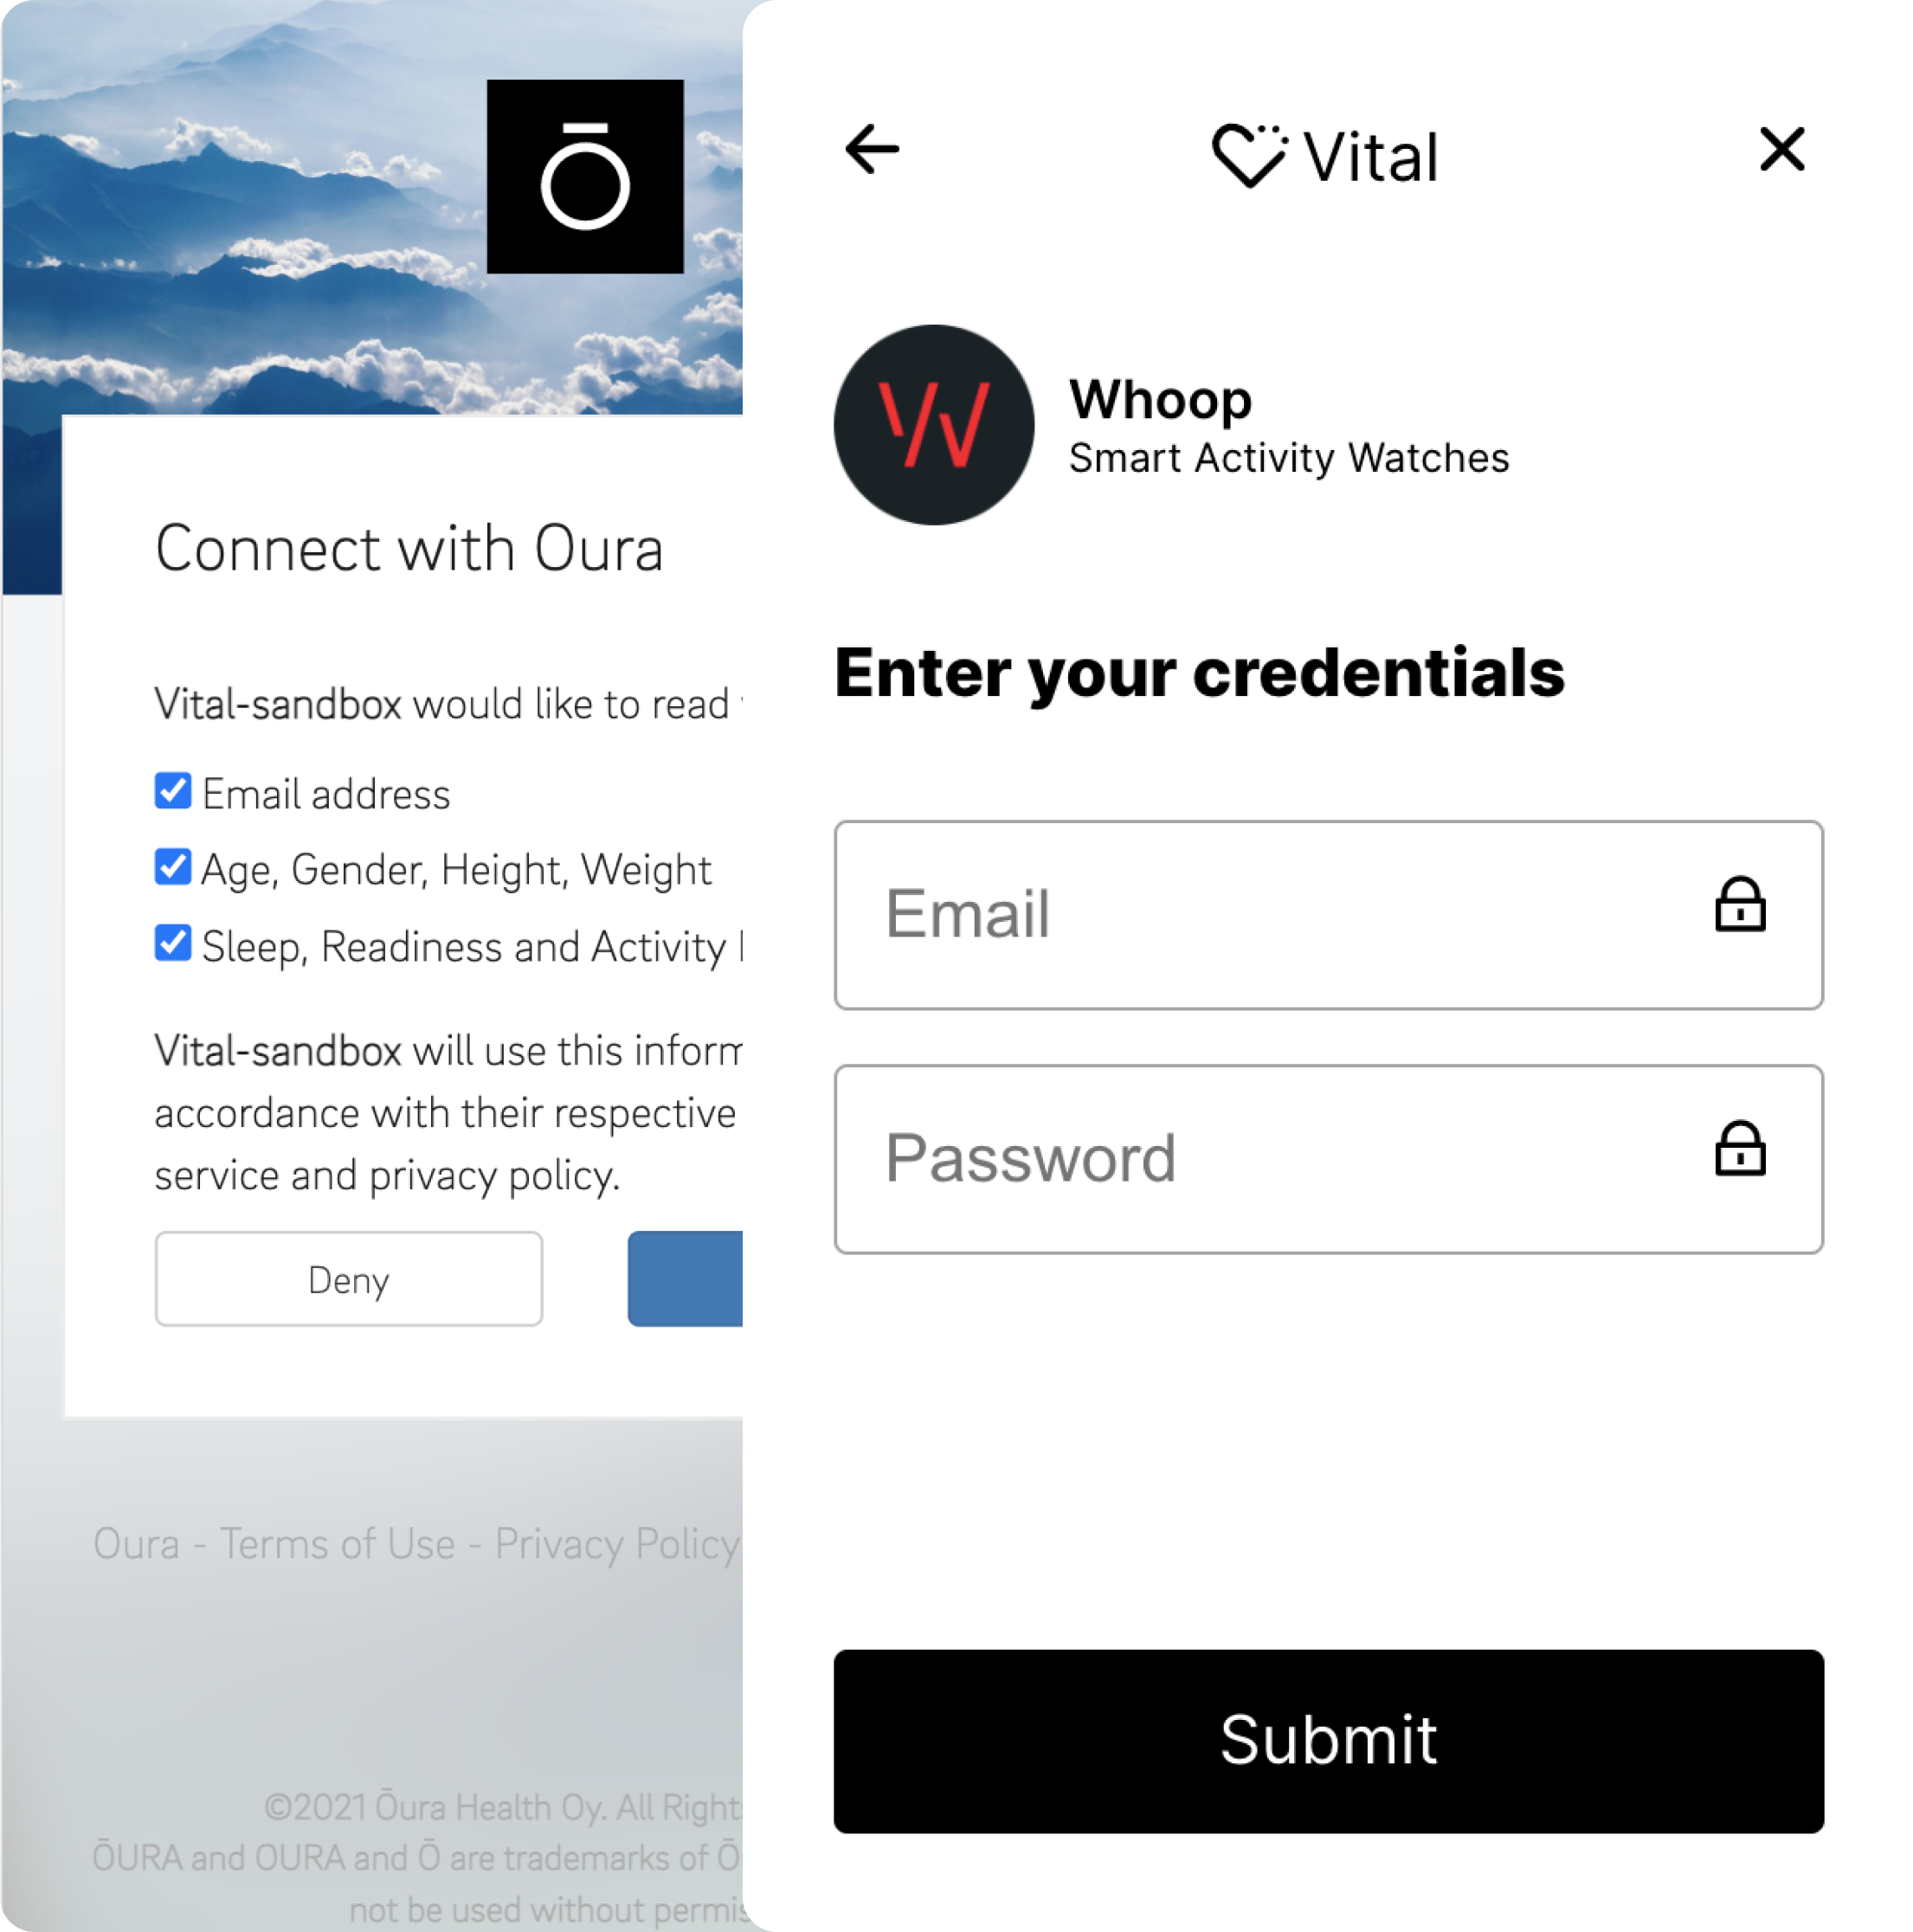
To connect a source, tap the connect button. This will launch the Junction Link Widget for that user.
Once you have entered your credentials and moved to the next screen, you have connected your first source!
You can now make API calls to retrieve data for that Source.
### How it works
As you might have noticed, you use both a server and a client-side component to access the Junction APIs.
A more detailed explanation of how linking works can be found in [link flow](/wearables/connecting-providers/link_flow).
The first step is to create a new `link_token` by making a `/link/token` request and passing in the
required configuration. This `link_token` is a short-lived, one-time use token that authenticates your
app with Junction Link, our frontend module.
```python Generating a Link Token theme={null}
# TEST BACKEND IMPLEMENTATION
from junction import Junction
from junction.environment import JunctionEnvironment
from fastapi import FastAPI
from starlette.middleware.cors import CORSMiddleware
client = Junction(
api_key="YOUR_API_KEY",
environment=JunctionEnvironment.SANDBOX,
timeout=30,
)
app = FastAPI()
app.add_middleware( # type: ignore
CORSMiddleware,
allow_origins=["*"],
allow_credentials=True,
allow_methods=["*"],
allow_headers=["*"],
)
@app.get("/token/{user_key}")
def get_token(user_key: str):
return client.link.token(user_id=user_key)
```
Once you have a `link_token`, you can use it to initialize `Link`. `Link` is a drop-in client-side
module available for web, iOS, and Android that handles the authentication process.
The Quickstart uses `Link` on the web, which is a pure JavaScript integration that you trigger via your own client-side code.
```javascript Generating a Link Token theme={null}
import { Button } from "@chakra-ui/react";
import { useState, useCallback } from "react";
import { useVitalLink } from "@tryvital/vital-link";
export const LinkButton: React.FC<{ userID: string | null }> = ({ userID }) => {
const [isLoading, setLoading] = useState(false);
const onSuccess = useCallback((metadata) => {
// Device is now connected.
console.log("onSuccess", metadata);
}, []);
const onExit = useCallback((metadata) => {
// User has quit the link flow.
console.log("onExit", metadata);
}, []);
const onError = useCallback((metadata) => {
// Error encountered in connecting device.
console.log("onError", metadata);
}, []);
const config = {
onSuccess,
onExit,
onError,
env: "sandbox",
region: "us",
};
const { open, ready, error } = useVitalLink(config);
const handleVitalOpen = async () => {
setLoading(true);
const token = await getTokenFromBackend(userID);
open(token.link_token);
setLoading(false);
};
return (
);
};
```
This is what your users see to connect their medical devices or wearables:
## 5. Making your first API request
We can now explore what happens when
you press the analyze button in the Quickstart to make an API call.
As an example, we'll look at the Quickstart's call to `/summary/sleep`, which retrieves sleep
summary data for a user. The request is simple and requires the Junction
`user_id`, `start_date` and `end_date`.
**Getting user sleep data**
```python Python theme={null}
from junction import Junction
from junction.environment import JunctionEnvironment
client = Junction(
api_key="YOUR_API_KEY",
environment=JunctionEnvironment.SANDBOX,
)
data = client.sleep.get(
"",
start_date="2021-01-01",
end_date="2021-01-02",
)
```
```typescript TypeScript theme={null}
import { JunctionClient, JunctionEnvironment } from "@junction-api/sdk";
const client = new JunctionClient({
apiKey: "YOUR_API_KEY",
environment: JunctionEnvironment.Sandbox,
});
const data = await client.sleep.get({
userId: "",
startDate: "2021-01-01",
endDate: "2021-01-02",
});
```
```java Java theme={null}
import com.junction.api.Junction;
import com.junction.api.core.Environment;
import com.junction.api.resources.sleep.requests.GetSleepRequest;
Junction client = Junction.builder()
.apiKey("YOUR_API_KEY")
.environment(Environment.SANDBOX)
.build();
var data = client.sleep().get(
"",
GetSleepRequest.builder()
.startDate("2021-01-01")
.endDate("2021-01-02")
.build()
);
```
```go Go theme={null}
import (
"context"
junction "github.com/junction-api/junction-go"
"github.com/junction-api/junction-go/client"
"github.com/junction-api/junction-go/option"
)
c := client.NewClient(
option.WithApiKey("YOUR_API_KEY"),
option.WithBaseURL(junction.Environments.Sandbox),
)
endDate := "2021-01-02"
response, err := c.Sleep.Get(context.TODO(), &junction.GetSleepRequest{
UserId: "",
StartDate: "2021-01-01",
EndDate: &endDate,
})
if err != nil {
return err
}
fmt.Printf("Received data %s\n", response)
```
```swift Swift theme={null}
let sleepData = try await VitalClient.shared.summary.sleep(userId, startDate, endDate)
```
## 6. SDKs and Libraries
We offer different SDKs so you can start building your app right away:
| | |
| -------------------------------------------------------------------- | ------------------------------------------------------- |
| [junction-api-sdk](https://pypi.org/project/junction-api-sdk) | Python library for calling Junction API on your backend |
| [vital-link](https://www.npmjs.com/package/@tryvital/vital-link) | React Library for initializing Link |
| [@junction-api/sdk](https://www.npmjs.com/package/@junction-api/sdk) | Junction TypeScript Client |
| [vital-ios](https://github.com/tryVital/vital-ios) | Junction iOS Client |
| [junction-java](https://github.com/junction-api/junction-java) | Junction Java Client |
| [junction-go](https://github.com/junction-api/junction-go) | Junction Go Client |
You can also download our [API collection](https://www.postman.com/collections/35339909-b0d080b7-3870-4aa8-a68b-a675f93a0533), or install Postman first and click the button below.
[](https://god.gw.postman.com/run-collection/35339909-b0d080b7-3870-4aa8-a68b-a675f93a0533?action=collection%2Ffork\&source=rip_markdown\&collection-url=entityId%3D35339909-b0d080b7-3870-4aa8-a68b-a675f93a0533%26entityType%3Dcollection%26workspaceId%3Ddd82502b-0c9d-4fe4-9760-73a54bc2b8bf)
## Next Steps
Congratulations, you have completed the Junction Quickstart!
There are a few directions you can go in now:
A client-side component your users will interact with in order to link their
accounts with Junction. It allows you to access their accounts via the Junction API.
Native toolkits to integrate Junction into iOS, Android, and Flutter
Webhooks are a way to receive data from Junction. We frequently poll to receive
data from the various providers.
 This can also be achieved via the API as follows.
 ## 5. Making your first API request
We can now explore what happens when
you press the analyze button in the Quickstart to make an API call.
As an example, we'll look at the Quickstart's call to `/summary/sleep`, which retrieves sleep
summary data for a user. The request is simple and requires the Junction
`user_id`, `start_date` and `end_date`.
**Getting user sleep data**
## 5. Making your first API request
We can now explore what happens when
you press the analyze button in the Quickstart to make an API call.
As an example, we'll look at the Quickstart's call to `/summary/sleep`, which retrieves sleep
summary data for a user. The request is simple and requires the Junction
`user_id`, `start_date` and `end_date`.
**Getting user sleep data**