> ## Documentation Index
> Fetch the complete documentation index at: https://docs.junction.com/llms.txt
> Use this file to discover all available pages before exploring further.
# Junction Devices SDK
> Use the Junction Devices SDK for Bluetooth-based device connectivity with required permission setup for iOS and Android projects.
## Prerequisites
Your app project must declare the required permission usage. This applies equally to native,
Flutter, and React Native app projects.
Add the following to your `Info.plist` file:
```xml theme={null}
NSBluetoothAlwaysUsageDescription
Our app uses bluetooth to find, connect and transfer data between different devices
```
Bluetooth permission on iOS is automatically requested on the first scanning attempt.
Add the following to your `AndroidManifest.xml`:
```xml theme={null}
```
You will have to request the appropriate permissions in your app before you can call the Junction Devices SDK.
## Bluetooth devices
### Choose Device Model
The SDK provides a list of supported Bluetooth devices. Select the matching instance to prepare for scanning.
```swift Native iOS theme={null}
import VitalDevices
let devicesManager = DevicesManager()
/// Get the brands
let brands = DevicesManager.brands()
/// Each brand has devices
let devices = DevicesManager.devices(for: brands[0])
```
```kotlin Native Android theme={null}
import io.tryvital.vitaldevices.*
val deviceManager = VitalDeviceManager.create(context)
val deviceModels = devices(Brand.AccuChek)
val deviceModel = deviceModels[0]
```
```typescript React Native theme={null}
import { VitalDevicesManager } from "@tryvital/vital-devices-react-native";
const devicesManager = new VitalDevicesManager();
let deviceModels = VitalDevicesManager.supportedDevices;
let deviceModel = deviceModels[0];
```
```dart Flutter theme={null}
import 'package:vital_devices/vital_devices.dart';
final deviceManager = DeviceManager();
final deviceModels = await deviceManager.getDevices(Brand.accuChek);
final deviceModel = deviceModels[0];
```
### Scanning for devices
First, you have to scan for one of the supported devices.
```swift Native iOS theme={null}
let cancellable = devicesManager
.search(for: state.device)
.sink { scannedDevice in
print("Discovered: \(scannedDevice)")
}
// Stop scanning
cancellable.cancel()
```
```kotlin Native Android theme={null}
val job = deviceManager
.search(deviceModel)
.catch {
Log.i("Devices", "Error scanning ${it.message}", it.cause)
}
.onEach { scannedDevice ->
Log.i("Devices", "Discovered ${scannedDevice}")
}
.launchIn(Dispatchers.Main)
// Stop scanning
job.cancel()
```
```typescript React Native theme={null}
let scanner = deviceManager.scanForDevice(deviceModel, {
onDiscovered: (device) => {
console.log("Discovered: " + device)
},
onError: (error) => console.log(error)
})
// Stop scanning
scanner.cancel()
```
```dart Flutter theme={null}
deviceManager.scanForDevices(deviceModel).listen((newDevice) {
Fimber.i("Discovered: $newDevice");
});
// Stop scanning
await deviceManager.stopScan();
```
Depending on the type of device you are connecting to, you will have to call different methods to connect to it.
### Blood Pressure Monitor
```swift Native iOS theme={null}
let scannedDevice: ScannedDevice
let reader = deviceManager.bloodPressureReader(for: scannedDevice)
reader.read(device: scannedDevice).sink { samples in
print("Read samples: \(samples)")
}
```
```kotlin Native Android theme={null}
val scannedDevice: ScannedDevice
val samples = deviceManager.bloodPressure(context, scannedDevice).read()
```
```typescript React Native theme={null}
let scannedDevice: ScannedDevice
let samples = await devicesManager.readBloodPressure(scannedDevice.id)
```
```dart Flutter theme={null}
List bloodPressureSamples;
bloodPressureSamples = await deviceManager.readBloodPressureData(scannedDevice);
```
### Glucose Meter
```swift Native iOS theme={null}
let scannedDevice: ScannedDevice
let reader = deviceManager.glucoseMeter(for: scannedDevice)
reader.read(device: scannedDevice).sink { samples in
print("Read samples: \(samples)")
}
```
```kotlin Native Android theme={null}
val scannedDevice: ScannedDevice
val samples = deviceManager.glucoseMeter(context, scannedDevice).read()
```
```typescript React Native theme={null}
let scannedDevice: ScannedDevice
let samples = await devicesManager.readGlucoseMeter(scannedDevice.id)
```
```dart Flutter theme={null}
List glucoseSamples;
glucoseSamples = await deviceManager.readGlucoseMeterData(scannedDevice);
```
After you have received samples, depending on the type of device, you might need to start scanning again to receive the
next set of samples.
## Freestyle Libre 1
Readings taken with the SDK are not guaranteed to match the official Freestyle
Libre app. This mismatch happens due to algorithm differences between our
implementation and the official Freestyle Libre.
We currently support Libre 1 sensors via NFC readings. Please make sure you add NFC capabilities in your app:
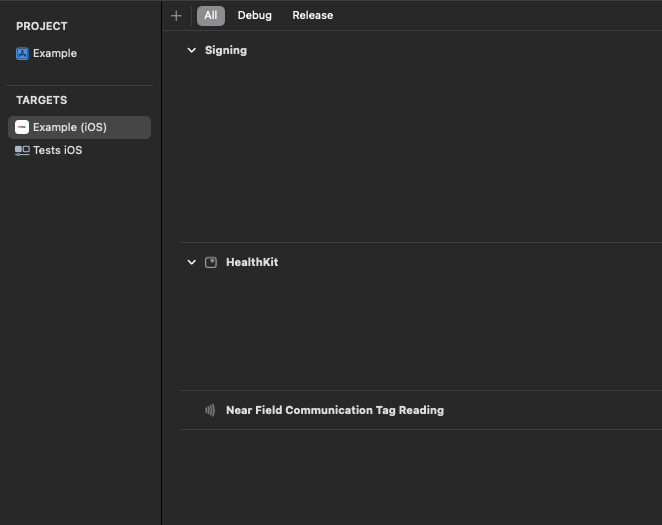 Also add the key `NFCReaderUsageDescription` in your Info.plist. This key should explain why your app needs to use NFC.
To use the reader:
```swift Native iOS theme={null}
let reader = Libre1Reader(
readingMessage: "Ready for reading",
errorMessage: "Failed reading from sensor",
completionMessage: "Completed successfully!",
queue: mainQueue
)
let reading = try await reader.read()
```
```kotlin Native Android theme={null}
import android.app.Activity
import io.tryvital.vitaldevices.devices.Libre1Reader
val currentActivity: Activity
val reading = Libre1Reader.create(currentActivity).read()
```
```typescript React Native theme={null}
import { VitalDevicesManager } from "@tryvital/vital-devices-react-native";
let devicesManager: VitalDevicesManager
let result = await devicesManager.readLibre1("reading", "errored", "completed")
```
`read()` returns a result object with two fields:
1. the sensor information; and
2. a list of glucose samples.
## Upload device samples to Junction
This automatic behavior is available since Junction iOS SDK 1.0.0, Junction Android SDK 3.0.0, Junction Flutter SDK 4.0.0
and Junction React Native SDK 4.0.0.
Junction Devices SDK automatically uploads any blood pressure and glucose samples discovered during
the read operation, provided that the Junction Core SDK [has a signed-in user](/wearables/sdks/vital-core#core-sdk-status).
The SDK does not currently buffer samples that fail to upload. You might want to ensure that the
device has Internet connectivity before initiating the read operation.
Also add the key `NFCReaderUsageDescription` in your Info.plist. This key should explain why your app needs to use NFC.
To use the reader:
```swift Native iOS theme={null}
let reader = Libre1Reader(
readingMessage: "Ready for reading",
errorMessage: "Failed reading from sensor",
completionMessage: "Completed successfully!",
queue: mainQueue
)
let reading = try await reader.read()
```
```kotlin Native Android theme={null}
import android.app.Activity
import io.tryvital.vitaldevices.devices.Libre1Reader
val currentActivity: Activity
val reading = Libre1Reader.create(currentActivity).read()
```
```typescript React Native theme={null}
import { VitalDevicesManager } from "@tryvital/vital-devices-react-native";
let devicesManager: VitalDevicesManager
let result = await devicesManager.readLibre1("reading", "errored", "completed")
```
`read()` returns a result object with two fields:
1. the sensor information; and
2. a list of glucose samples.
## Upload device samples to Junction
This automatic behavior is available since Junction iOS SDK 1.0.0, Junction Android SDK 3.0.0, Junction Flutter SDK 4.0.0
and Junction React Native SDK 4.0.0.
Junction Devices SDK automatically uploads any blood pressure and glucose samples discovered during
the read operation, provided that the Junction Core SDK [has a signed-in user](/wearables/sdks/vital-core#core-sdk-status).
The SDK does not currently buffer samples that fail to upload. You might want to ensure that the
device has Internet connectivity before initiating the read operation.